Introduction
The Infinite Runner Engine uses managers as central reference points for a lot of classes and components. These managers, always present in your scene, will remember the current points count, the sounds that are playing, or where to spawn the character(s).
There are a few of them, and in most scenes you’ll have a Game, Level, Input and Sound managers present at all time. Usually you’ll want to place them on empty gameobjects. Their position in your scene doesn’t matter, they’re invisible anyway. It’s good practice to put them out of the way of your level so you don’t delete them by accident.
Game Manager
The Game Manager is a high level manager that is responsible for setting the target frame rate, storing the points, handling the timescale, and handling the life system. In most cases you won’t have to interact with it much, but make sure there’s one in your levels. The API documentation is a good place to go to if you want more information about it.
Level Manager
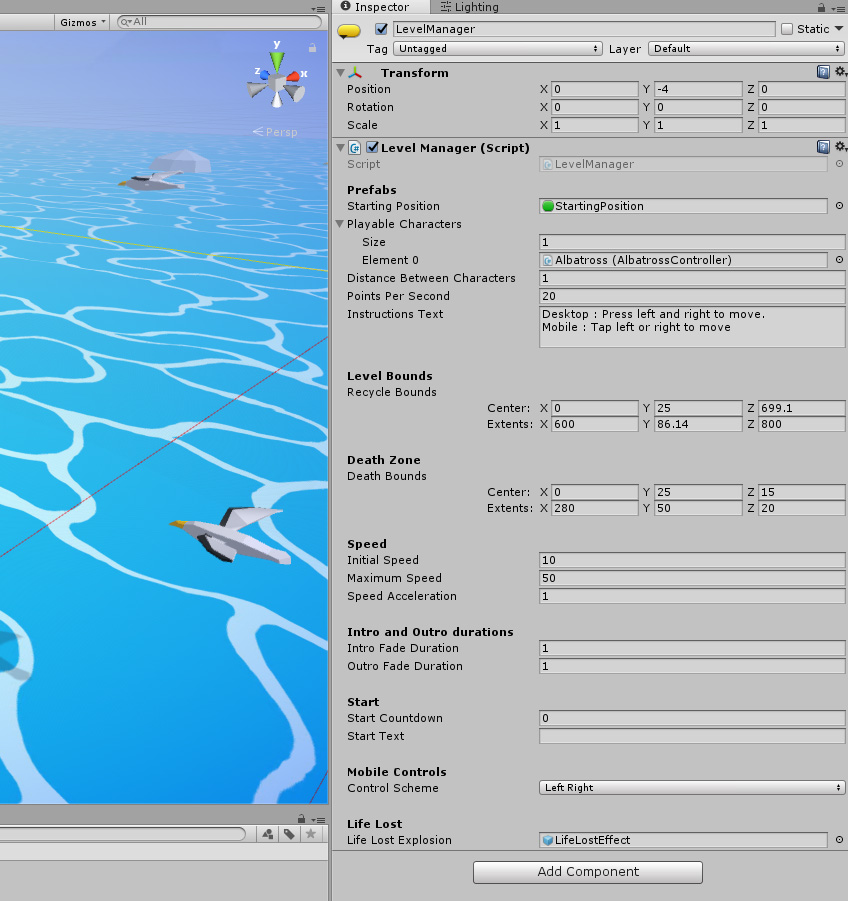
The LevelManager is the central piece of each of your game scenes. It’s responsible for spawning the character(s), driving the game’s speed, handling level bounds and death zone, intro and outro duration, and initial countdown. Usually placed on an empty game object, it’s one of the few required elements in your scene.
-
In order to add a PlayableCharacter in your scene, you should not put the prefab actually in the scene. It’d work, but the LevelManager (and other game logic managers) wouldn’t know what the “real” player character is. Instead, select your scene’s LevelManager, and in its inspector you’ll see you can define a number of PlayableCharacters. Most games only have one, but you can have more if you want. Once you’ve defined the number of player characters you want, just drag a PlayableCharacter (or extended) prefab into the slot, and you’re done. If you have more than one character, you can also specify how far from each other they should spawn.
-
From the inspector you can define two bounds for your level : the recycle and death bounds. Both are just big boxes. The Recycle Bounds are a box outside of which all objects with a OutOfBoundsRecycle component will get recycled. This is especially useful when working with Spawners. Death bounds on the other hand are a box outside of which all PlayableCharacters will get automatically killed.
-
From the inspector you can also define the Speed at which the level will start, its maximum speed, and how much the Level’s speed should increase per second. This speed will affect all objects with a MovingObject component, as well as all parallax elements.
GUI Manager
The GUIManager, usually placed on a UICamera, is responsible for displaying the current Life count, the Pause screen, the initial level countdown, the points, transitions between scenes and the game over screen. Note that it’s completely optional, if you don’t want any GUI (or want a different one, you can remove it and the UICamera, you won’t get any error for that).
Input Manager
The Input Manager handles the inputs and sends commands to the player. It’s described in more details on the Input page.
Loading Scene Manager
With Unity, usually when you want to go to another scene (in a menu, or to go from one level to the next for example), you’d use the SceneManager API, and probably the SceneManager.LoadScene() method. The engine comes with its own scene change API, that you’re completely free not to use if you don’t like it. Personnally I think that this method doesn’t provide visual feedback to the player, and scene loading on mobile for example can be a few seconds long, so just having a black screen there isn’t really good looking.
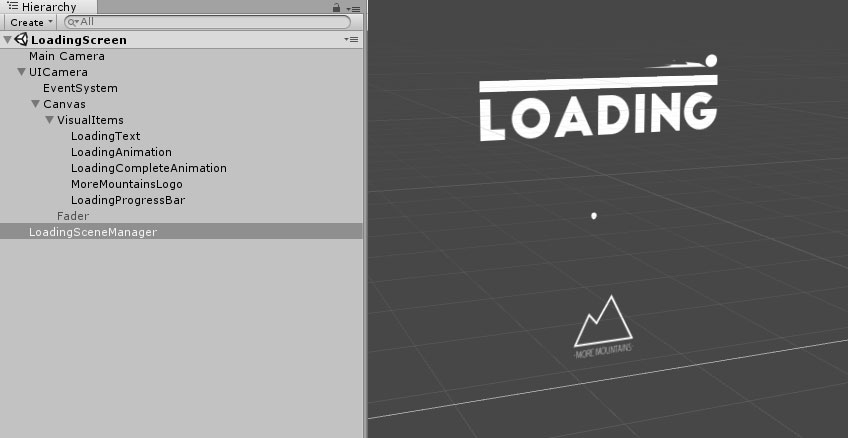
If you want to provide a better experience to your player, you can use the Loading Scene Manager :
- it can be called from anywhere, you don’t have to have a LoadingSceneManager in your scene
- it handles loading (as the name implies), showing an animation and a progress bar
- it’s completely customizable, just edit the Common/LoadingScene scene’s contents. You can easily add your own logo, change the look of the progress bar, what animation is playing, etc.
- it’s pretty simple to use
To use the LoadingSceneManager API, when you want to change level, just call the LoadingSceneManager.LoadScene (string sceneToLoad) method. The string parameter you pass must of course match the name of the scene you’re trying to load. So if you were to load the minimal demo multiplayer level for example, you’d use :
LoadingSceneManager.LoadScene ("Minimal4Players");
And the engine will take care of the rest ![]()
Sound Manager
As its name implies, the Sound Manager is in charge of playing sounds in the Corgi Engine. Of course you can play them directly in your code using Unity’s native APIs, but using the Sound Manager will ensure that it’s played using the same volume settings as other sounds, that they won’t be played if sound has been disabled, etc. It’s usually found on the same prefab as the GameManager script. From its inspector (or from your code), you’ll be able to set the music and sound effects (Sfx) volume, and whether or not each is active. You can have a look at the API documentation for details, but mostly you’ll be using the following methods :
To play a background music (will replace any previously playing background music) :
PlayBackgroundMusic(AudioSource Music);
To play a sound effect - you can specify its position in space, and whether or not it should loop (make sure you stop it in this case) :
PlaySound(AudioClip sfx, Vector3 location, bool loop=false);
Extending a manager
If for some reason you want to modify a manager’s behaviour, the best way to do so is to extend it. That way, you won’t lose your changes if you update the asset. Extending a manager is fairly easy. All you have to do is create a new class, that inherits from the manager whose behaviour you want to change, like so :
using UnityEngine;
using System.Collections;
using MoreMountains.Tools;
using System.Collections.Generic;


namespace MoreMountains.InfiniteRunnerEngine
{
	public class NewGameManager : GameManager
	{
		protected override void Start()
	    {
			base.Start();
			MMDebug.DebugLogTime("new game manager");
	    }

		public override void Pause()
		{
			base.Pause();
			MMDebug.DebugLogTime("new game manager pause");
		}

		public override void AddPoints(float pointsToAdd)
		{
			base.AddPoints(pointsToAdd);
			MMDebug.DebugLogTime("new game manager add points");
		}
	}
}
In this example, a new GameManager is created, and a few of its methods are overridden. They don’t do much, they just do what the base class does, and then output a debug message. Of course, you could have them do much more. All you have to do then is to place that new manager in your scene on an object, and remove the base one.
You can also decide to add new features to your extended version of a manager. Like so, for example :
using UnityEngine;
using System.Collections;
using MoreMountains.Tools;
using System.Collections.Generic;


namespace MoreMountains.InfiniteRunnerEngine
{
	public class NewGameManager : GameManager
	{
		public virtual void Hello()
		{
			MMDebug.DebugLogTime("hello!");
		}
	}
}
In that case, if you want to call that Hello() method from another class using the singleton pattern, remember to cast appropriately, like this :
(NewGameManager.Instance as NewGameManager).Hello();